We were recently gifted a copper plate from an Israeli artist with a complex embossed design. The work to make such designs intrigued me, so I looked up repousse and chasing. The tools required are simple and potentially could be made by yours truly. The tools are not inexpensive, Victoria Lansford Chasing Tools, but beautiful.

Since I am not convinced this is a skill I would like to add to my arsenal, I will make my own, probably less than beautiful, eastern repousse and chasing tools. Repousse is raising the image from the back side of the metal sheet, while chasing is lowering the image from the front side. Consider a petal from a flower. the outline is drawn on or transfered to the backside of the metal. The metal is held in pitch in a pitch bowl. A hammer and the appropriate tool are used to first outline the petal, and then stretch the metal into a bowl shape inside the outline of the petal, the repousse part of the process.
The metal plate with the bulbous petal is filled with pitch, flipped over and stuck to the pitch in the bowl. The chasing tools are then used to accomplish two things. First, the outline of the petal bulge is tapped with the tool almost at 90°. This provides the edge of the petal coming up and out of the plate. The inside of the petal is then hammered down in a bowl shape, though not as deep as the repousse. This provides a slightly bowl shaped petal floating above the background. Significant time is then spent smoothing out the interior and cleaning up the petal to make it look lifelike.
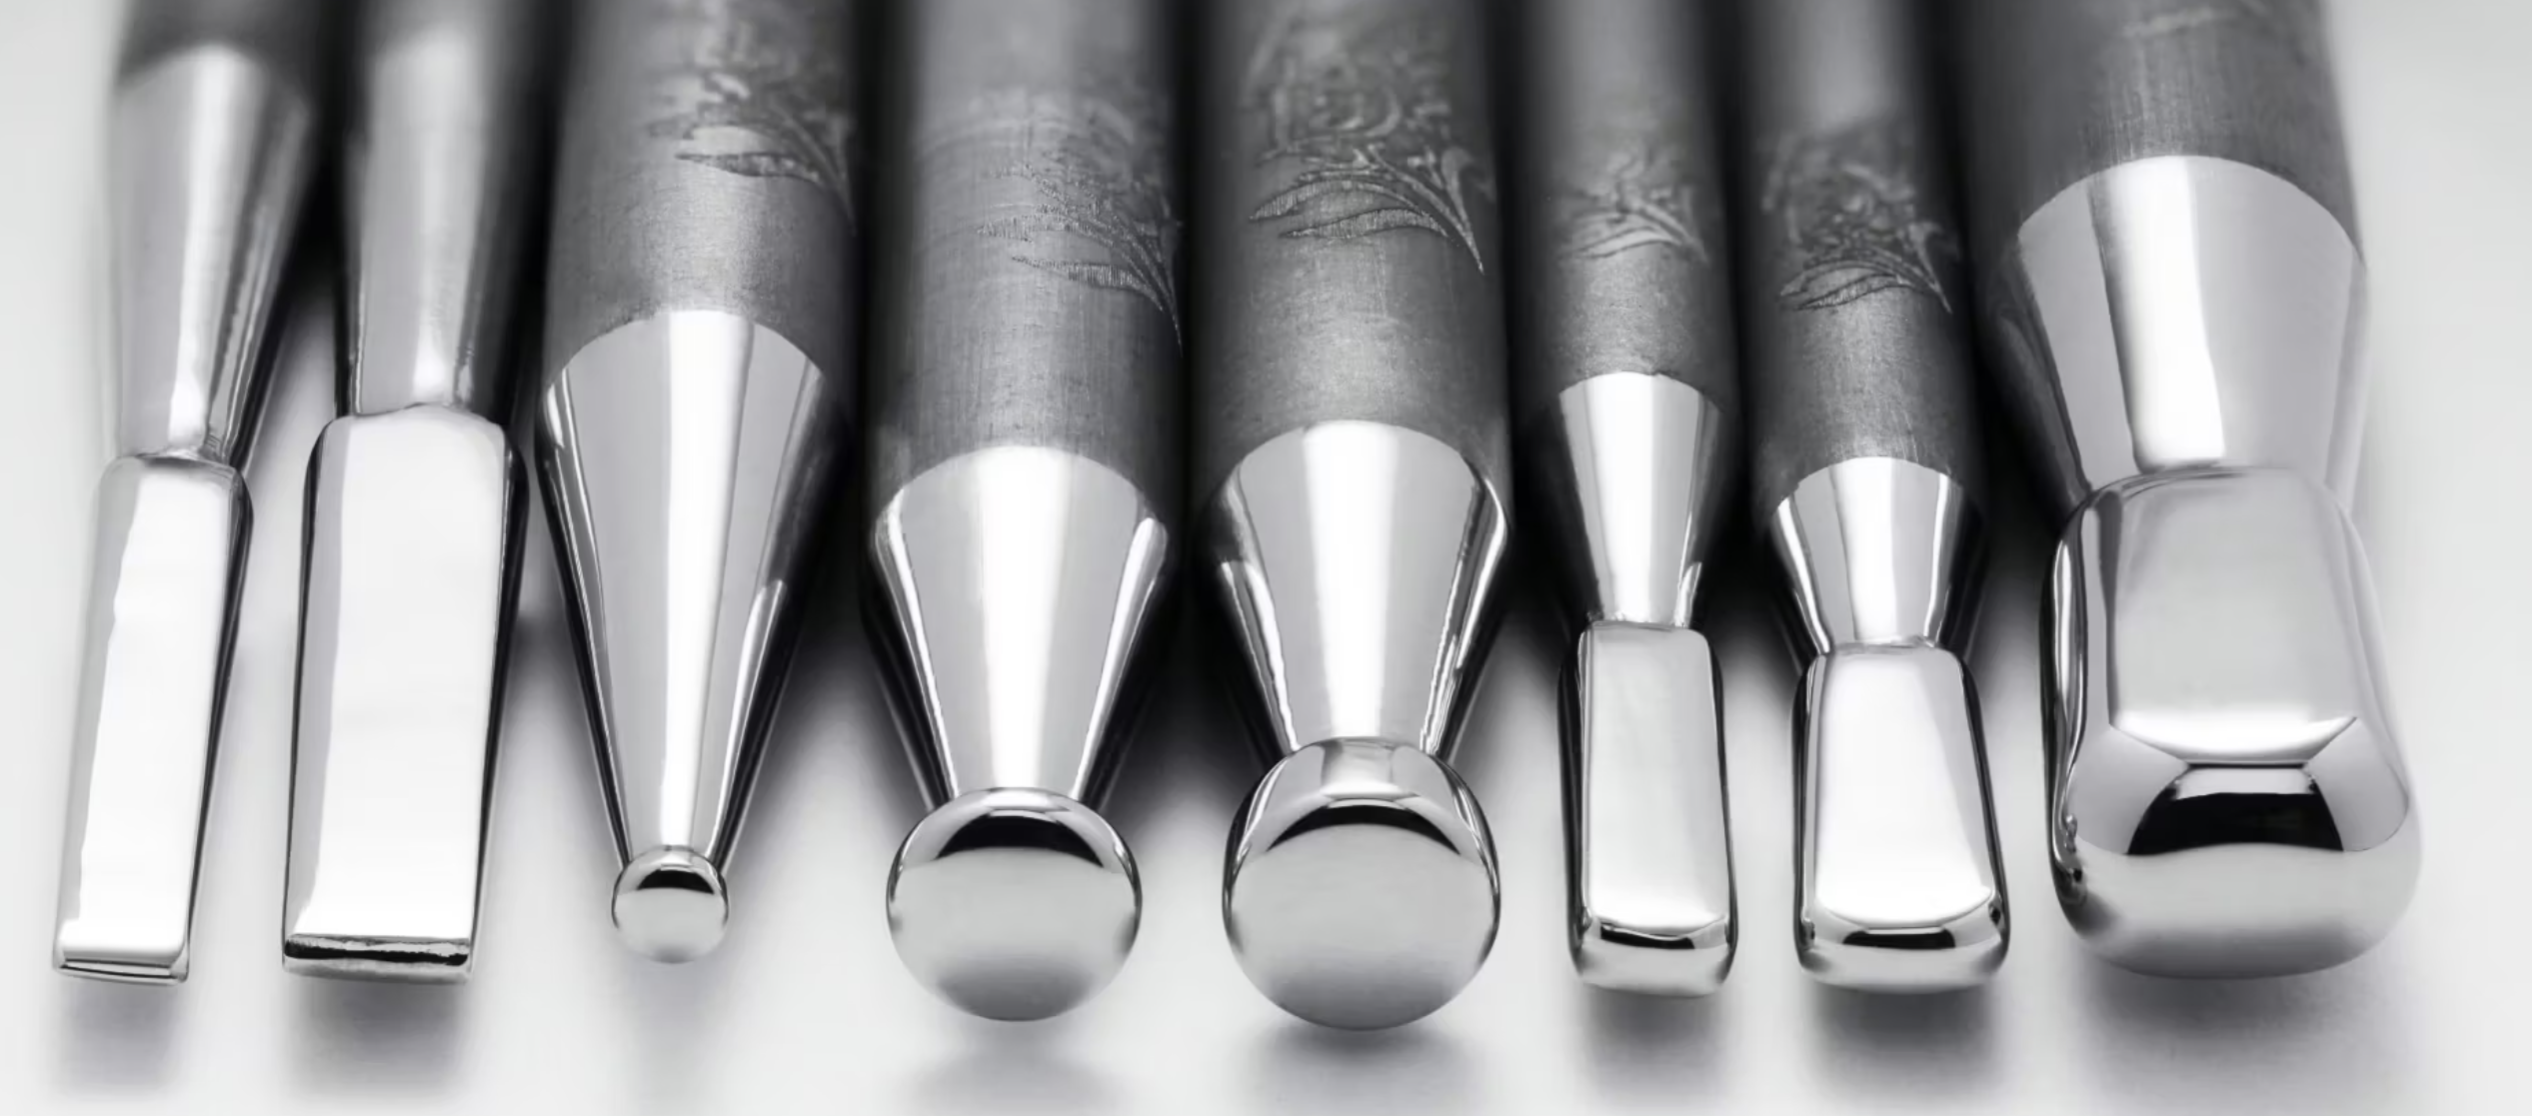
The tools shown above seem to be about four to five inches long and held between the fingers. The business end needs to be hardened and polished, any roughness here is transfered to the metal. The opposite end, hit with the hammer, should probably be soft and will probably mushroom over time. The hammers used look very similar to the hammer I use for engraving, though maybe a bit larger and heavier.
The plan is to use oil hardening drill rod for the tools, shape them in the lathe and by hand, then harden and polish. Of the eight tools pictured four are probably 5/16" diameter, three are 3/8" and one is 1/2" diameter.
The 5/16" diameter tool on the left will be the first tool tackled. It is 4" long, and each of the two tapers will be 3/4" long. A 4" length of drill rod was parted off of stock with a hacksaw. The part was held in the chuck with about 1" extended. It was faced and the headstock turned to about 4.5°. 3/4" of the end was tapered leaving about 3/16" diameter at the end. Another 1" was pulled from the chuck and the second taper was cut. Both tapers were sanded as I've never been able to get a decent finish from drill rod.


I made a set of indexing blocks to hold the chuck a while back, but they are not drilled through. Indexing this tool requires a block with a through hole. The four-sided indexing block was centered in the four jaw chuck. A hole was drilled through the block beginning with a 1/4" drill and progressing to a 31/64" drill, the largest drill I have for the Sherline lathe. The block was screwed to the back of three jaw chuck with the part still held in place.

The indexing block, chuck and part went to the garage and were held in the vise. A bastard file was used to first file a flat on one side of the taper and after rotating the indexing block 180° a matching flat was filed on the opposite side.


The end of the tool was filed round attempting to keep it all symmetrical. The filed portions of the tool were sanded with 180 grit sandpaper.

Before hardening the tool end was sanded up to 2000 grit using a polished granite block as backing for the sandpaper. The tool was then heated on firebrick to cherry red for one minute with a propane torch. The hot tool was quenched in oil. Most of the black char was sanded off with 2000 grit sandpaper. The tool was then polished on the polisher with green rouge. A bit of cleanup with soap and water removed the now black rouge residue. The tool needs to be tempered, but that will wait until all of the tools are complete.

The next three tools were the three remaining 5/16" shafts, all cut from stock at 4". The second chasing tool from the left was made next, much like the first just a bit larger. A 1/4" wide tip was made by cutting a 2° angle. The back angle was cut at the same 4.5° from the first tool. The tool was then shaped with a file and the end rounded. One tool dimension I can't really discern from the above tool photo is the radius of the roundover. I just guessed. This tool has a larger roundover than the last.

The next two tools made from 5/16" stock have two major differences from the previous two. The tips are closer to 1/2" and the taper behind the tip is also 1/2" long. The tips are not tapered, or are minimally tapered. The dimensions of the smaller will be about 1/8" thick and 1/4" wide, while the larger will be 3/16" thick and 5/16" wide. Let's get cutting!
The tip on the smaller tool was reduced to 1/4" and the taper behind the tip was cut with the headstock rotated 11°. The cut surfaces were sanded to 2000 grit. The larger of the two tools did not have the tip reduced, but the taper was cut the same as the first. The two pictures below show the two tools after the lathe work was completed.


Both tools then were taken to the cold garage and again using the indexing fixture were filled on two faces. This time the faces were parallel. The smaller tool was filed to 1/8" thickness and the front edge and corners were rounded. The larger tool was filed such that the two faces were about 1/4" apart. Its end was also rounded from face to face and the corners rounded.


The previous three chasing tools were sanded from 220 to 2000 grit and are shown in the photo below.

The next three tools were all made with 3/8" drill rod. Again 4" lengths were cut with a hacksaw. The ends were faced and one end of each had the corner rounded. The opposite ends were tapered to the round tips. The first was tapered to 1/8" from the end and 0.10" diameter after reducing 1/8" to 0.125". This tip was then rounded with a file, smoothed with a fine file and then sanded to 2000 grit. The process was repeated with the next two round tipped tools. The middle size tip was reduced to 1/4" before tapering behind this reduced section. The largest was left 3/8" before tapering (11° for the three tapers above.) The end of the largest was slightly tapered, 5°, in the opposite direction before shaping the end. The five photos below document the lathe work and sanding.


The last tool is the largest one on the right in the photos above and will be made from 1/2" drill rod. A 4" length was hacksawed off. Easiest is doing the lathe work on the South Bend in the garage. Tomorrow is predicted to be warm, so that is the current plan. The taper will be cut at the usual 11° and the tip's opposite taper at 5°. My indexing block will not work for 1/2" stock, so another way will need to be developed to ensure the two filed faces are parallel.
The lathe in the garage is set up to cut the cast iron blocks for a different project, so a different direction was explored. The steady rest was put in place and both ends of the shaft were faced. The Sherline compound was put in place. It cuts from the backside as shown in the first photo below. The 11° taper was cut first and then the 5° taper to define the overall shape of the tip. The completed tapers are seen in the second photo.
The part was moved to the vise in the garage and a flat was filed on one side. The part was rotated 180° and the second flat was started. Two rules were used, one pressed against the filed flat on the bottom and one on the top flat. Filing was adjusted as needed to keep the two rules parallel by eye. This worked better than expected. The end of the part was then shaped rounding all of the corners with a file. A finer file went back over the new surfaces prior to sanding the tool to 2000 grit.


The seven unhardened tools were laid out on the firebricks and heated with a torch. One or two on the end were heated more intensely and when red were quenched in the oil. The next two were heated to red and quenched, repeating until all seven were hardened. After the tools cooled they were sanded with 2000 grit sandpaper in order to remove the char. The tools after hardening and before cleanup are shown below.

Tempering is new for me. (Let's hope the April Fool's Day Grinch doesn't ruin my baking!) The eight tools were placed on an aluminum pie pan and set in the oven as it heated to 400°. The tools were left in the hot oven for one hour. The photo below shows the cooled tempered tools.

The final step is polishing the eight tools. This was quick using the polisher primed with green rouge. The handles were only polished near the taper leaving most of the heat treating coloration in place. The color is a nice touch. The two photos below show the completed chasing tools.

